How to Upload Photo From Iphone to Mac
Are y'all looking for a seamless method for transferring your photos from your iPhone to your Mac? Whether you use your Mac for editing photos and videos or equally a backup storage device, or y'all just want to relieve valuable infinite on your iPhone, here are 6 easy ways to transfer photos and videos from your iPhone to your Mac.
Earlier you transfer photos from your iPhone to a Mac
Earlier transferring your photos from your iPhone to your Mac, requite your Photographic camera Roll a in one case over and delete blurry photos, useless videos, and duplicates. Why? Considering unless you're paying for unlimited cloud storage, cleaning up your iPhone photos before moving them to your Mac will simplify the unabridged process. Doing so will save y'all digital storage space, time, and frustration.
It would take you hours to go through all your photos manually, just our app Gemini Photos will make the process that much faster.
Time needed:15 minutes.
Here's how to quickly and easily clean upward your photo library with Gemini Photos.
- Download Gemini Photos
Gemini Photos is available on the App Store.
- Scan your photograph library
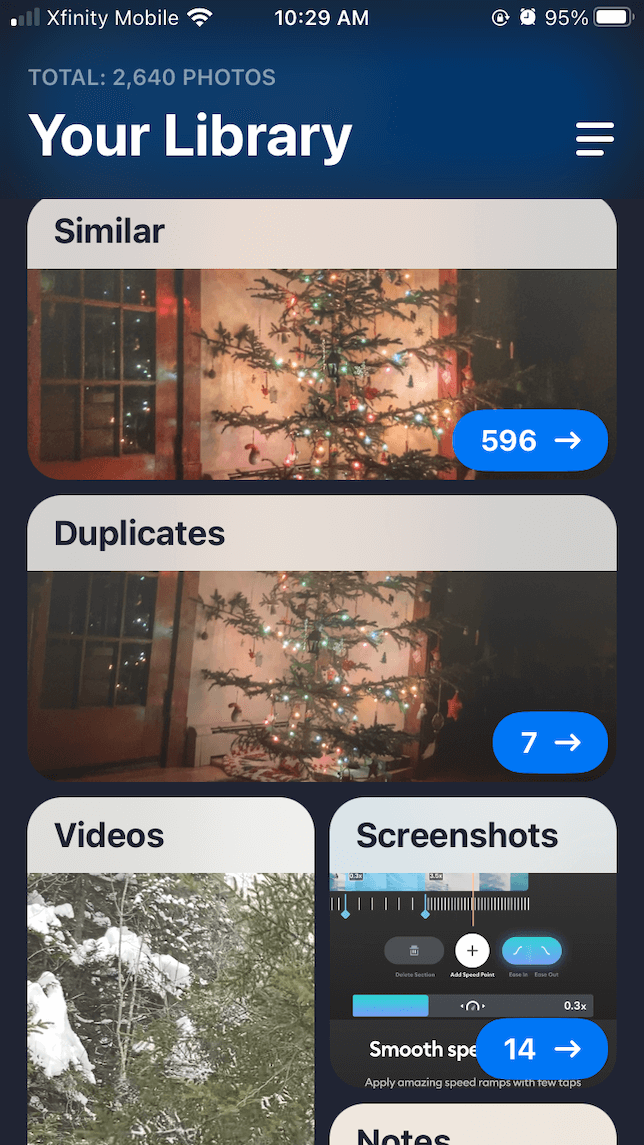
When you open the Gemini Photos app, your abode screen volition sort your photos into categories: Similar, Duplicates, Videos, Screenshots, Notes, Blurred, and Other. When you click on a category, you tin see all of the photos that might be taking up unnecessary space in your photo library.
- Corroborate photos and videos to delete
Tap Similar to become started. Gemini photos volition group all similar shots together, with the best option on top. If you hold with the option, go along the height issue and move the residual to Trash. You can also choose Keep All if you don't desire to get rid of any of the photos in the series.
For Screenshots, Notes, and Blurred, merely tap Delete All to articulate all selected photos. In Videos and Other, swipe up on the photos/videos that you want to keep, and swipe down on photos/videos that yous want to delete.
- Empty Trash
Afterward browsing through your photos in each section and choosing the ones you lot want to delete, tap Empty Trash.
- Clear Recently Deleted in Photos
In one case you're done, head to your Photos app and open the Recently Deleted album. Tap Select > Delete All to delete your photos permanently and free up storage infinite.

6 ways to transfer photos and videos from iPhone to Mac
When it comes to moving photos between devices, we recommend that you choose the method that works all-time for you and make it a regular part of your photo and video direction system. The following are some options to consider.
1. How to motion photos from iPhone to Mac using Finder
If you are running macOS Catalina (10.15) or later, yous can easily sync your iPhone with your Mac using Finder. Here's how to do it:
- Connect your iPhone to your Mac with a lightning-to-USB cable.
- Open Finder on your Mac.
- On the left sidebar, click on the name of your iPhone under Devices.
- Click Photos.
- Check the Sync Photos box.
- Cull the binder or app on your iPhone that you want to sync photos and videos from.
- Choose whether yous want to sync all of your photos and albums or just selected albums.
- Click Utilise.
2. How to transfer photos from iPhone to Mac using Photos
Your photos and videos can be hands synced using the Photos app on both iOS and macOS. All y'all have to do is plug your iPhone into your Mac using a Lightning-to-USB cable. When your iPhone is connected, the macOS volition open up Photos automatically. Here'due south how to transfer photos from iPhone to Mac using the Photos app:
- Connect your iPhone to the Mac using a Lightning-to-USB cable.
- If you oasis't synced your photos using this method earlier, exist sure to confirm that yous are using a trusted device.
- If the Photos app doesn't automatically load on your Mac, open it using Launchpad on your dock (the icon that looks like a rocket).
- Choose your iPhone from the menu on the left sidebar.
- Your photos and videos will appear on the screen. Click Import All New Items in the peak-right corner. Or if yous don't want to import all of your photos, yous can click on the photos that you desire to import and click Import Selected.

3. How to sync photos and videos from iPhone to Mac using iCloud
Want to access your photos and videos from any Apple tree device? Automatically syncing your photos to iCloud makes this a cakewalk. When you sign upwardly for iCloud, y'all are automatically allotted 5GB of free storage. Boosted iCloud storage options starting time at $.99 a month for 50GB. Here's how to ready iCloud photos so that your photos and videos sync automatically with your other Apple devices.
On your iPhone:
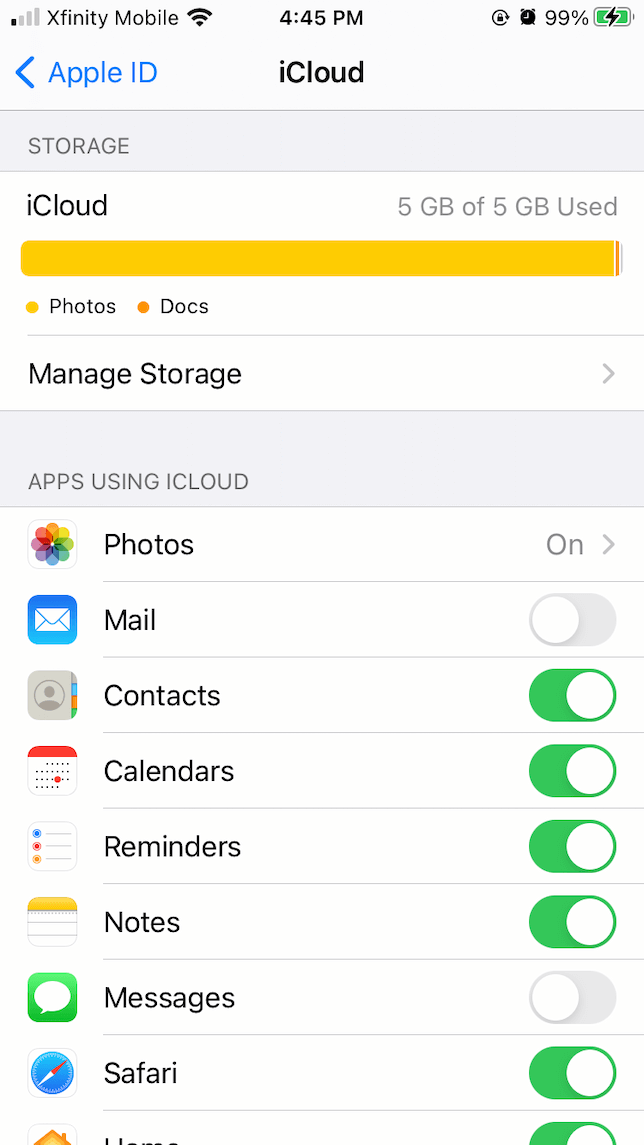
- Go to Settings and tap your name at the top of the screen.
- Tap iCloud to run across all the apps that are using iCloud.
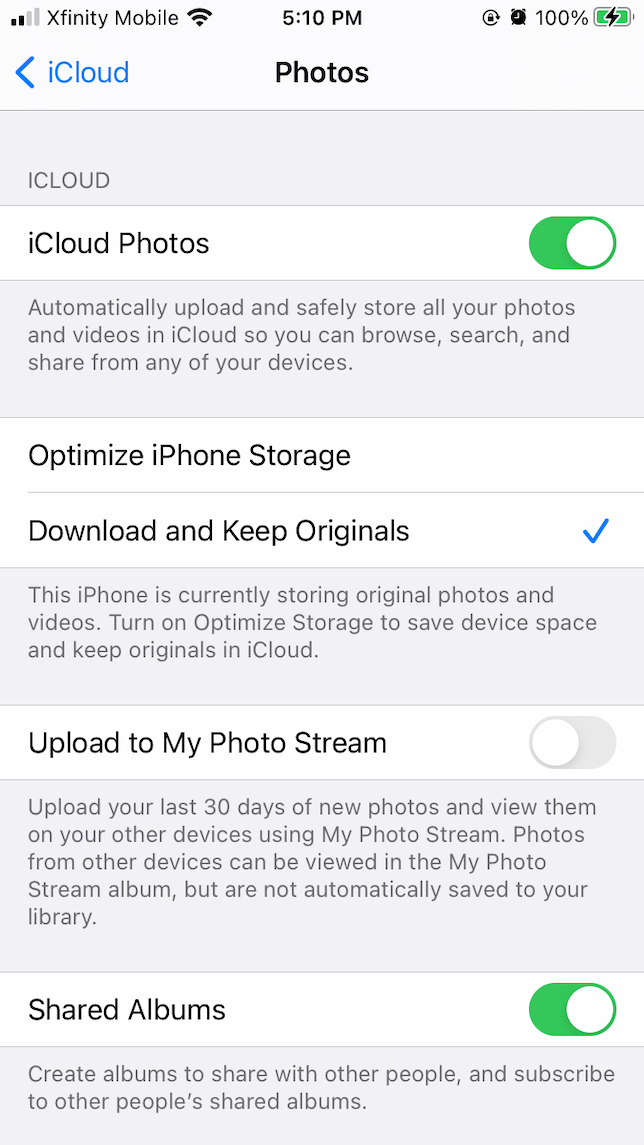
- Tap Photos.
- Toggle iCloud Photos to the on position.
On your Mac:
- Open the Photos app.
- Click Photos on the acme menu bar.
- Toggle iCloud Photos to the on position. Provided that y'all accept enough storage space, your photos will at present sync automatically beyond devices.
iv. How to move photos from iPhone to Mac with Image Capture
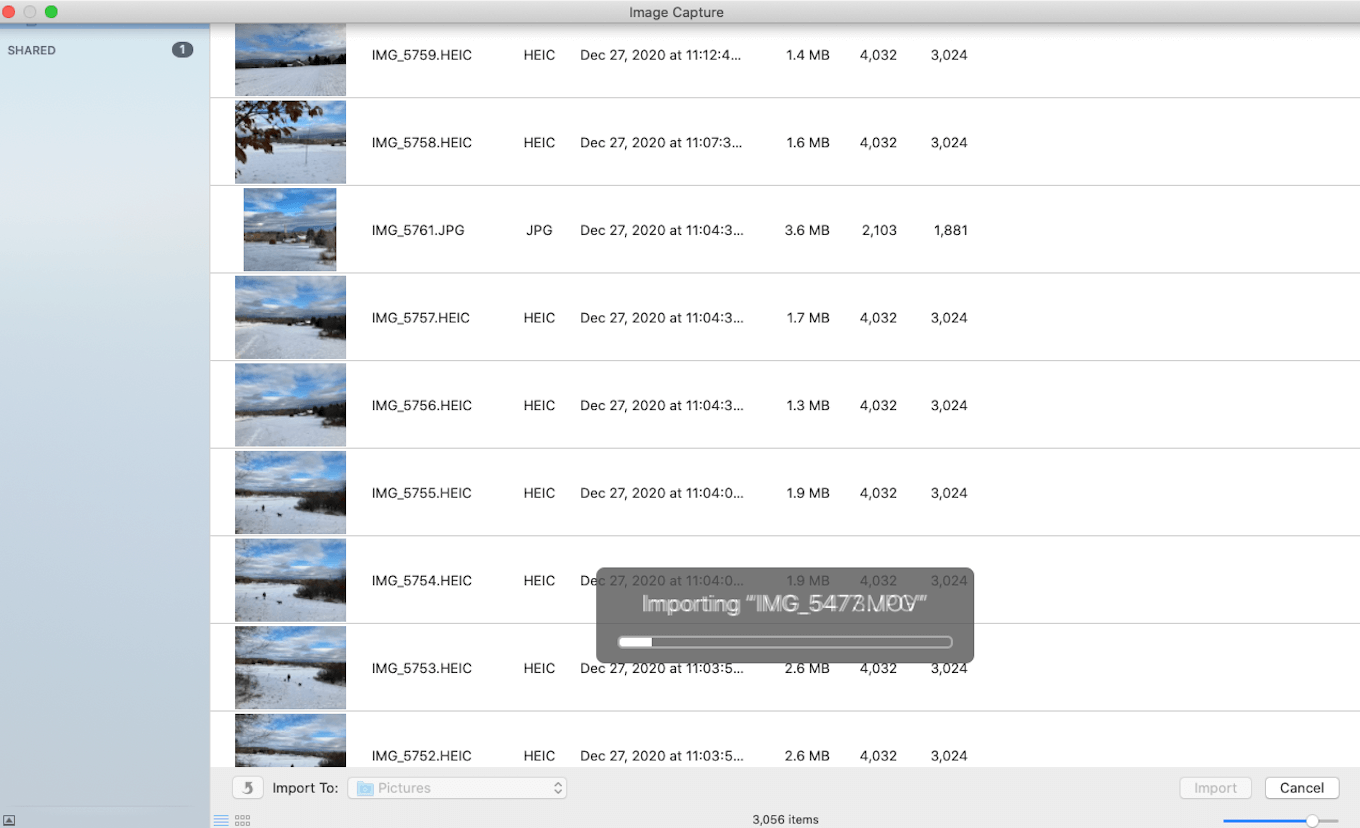
The Image Capture app is a native app on your Mac. Using a Lightning-to-USB cable, you tin can rapidly and hands download your photos to a folder of your option using Prototype Capture:
- On your Mac, open up Launchpad and search for Image Capture to open information technology.
- Connect your iPhone to your Mac with a USB cablevision.
- Under Devices on the sidebar, click your iPhone.
- Your photos will appear on the screen.
- At the bottom of your screen, choose the folders where you lot want to import your photos.
- Click Import All (or select the individual photos you want to import) and click Import.
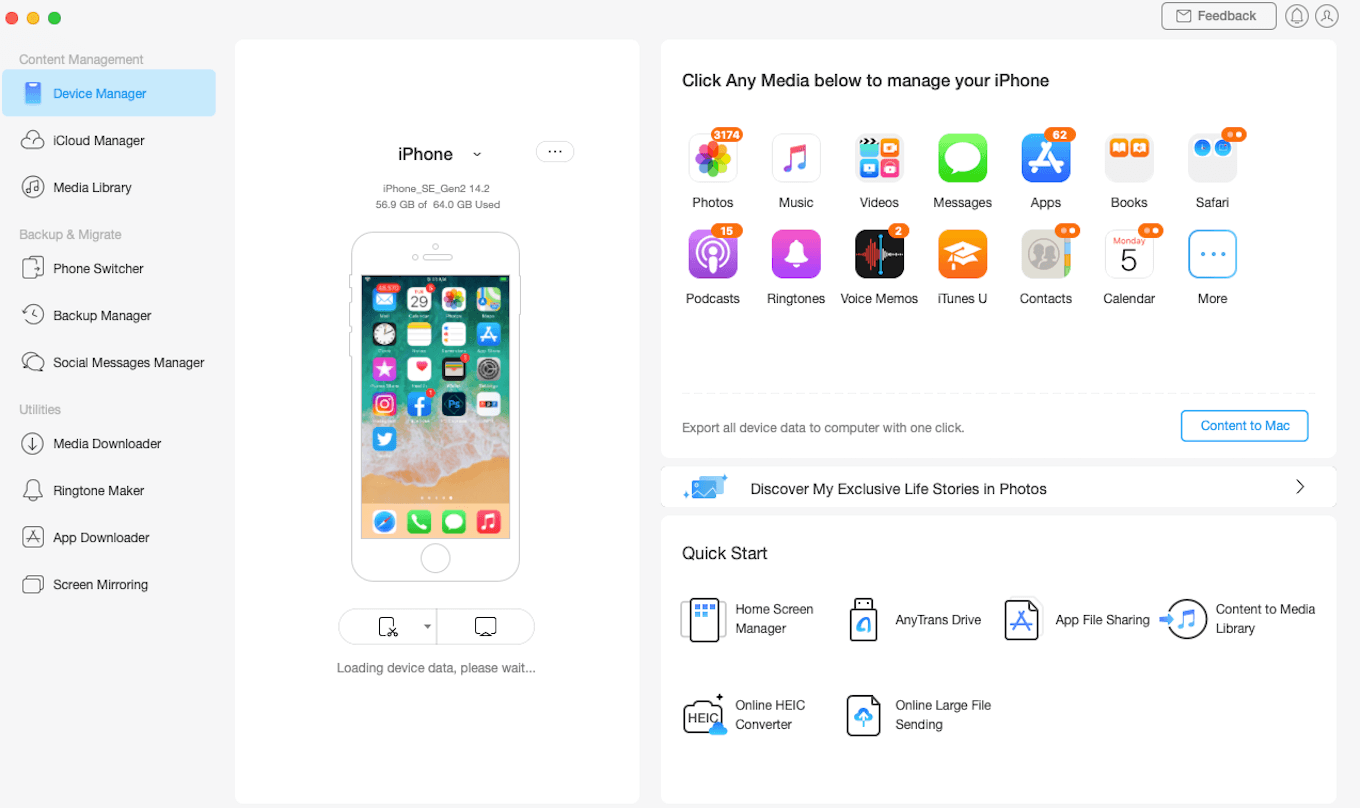
5. How to copy photos and videos from iPhone to Mac with AnyTrans
If you lot're looking for an app that volition permit y'all to transfer and back up all your files, check out AnyTrans, which is a combination media downloader and backup tool that transfers photos, music, and videos from your iPhone or iPad straight to your Mac:
- Install AnyTrans on your Mac and open it.
- Connect your iPhone to your Mac using a USB cablevision.
- Requite AnyTrans permission to admission your photo library.
- Click on Photos to open up your iPhone photo library on your Mac.
- At the top of the screen, choose Select All or click one by one on the photos and videos yous desire to transfer.
- Click To Mac at the tiptop of the screen.
- A pop-upwards menu will announced, request if you want to alter the photo export setting. Click Okay.
- Under Full general, click the destination folder for your photos.
- Under Export Photos, choose the settings for exporting your photos.
- When you are finished, click Save. Your photos will exist transferred automatically to the folder y'all have chosen.
half-dozen. How to transfer photos and videos from iPhone to Mac with AirDrop
AirDrop is a great tool for wirelessly transferring photos and videos betwixt your Mac and your iPhone. Using AirDrop, you can transfer in either direction without a cable. While it'south convenient to AirDrop a few photos from iPhone to Mac, if you're transferring a large number of photos, it's amend to employ 1 of the methods mentioned above.
Kickoff, you will need to turn on AirDrop on your iPhone:
- Open the Settings app on your iPhone.
- Tap General, then scroll down and tap AirDrop.
- Choose Everyone or Contacts Simply, which will make up one's mind who y'all can receive files from.
To make sure that AirDrop is enabled on your Mac:
- Open up Finder on your Mac.
- Select AirDrop from the sidebar.
- A window will open up, showing your AirDrop contacts.
- Below the AirDrop icon, click on the dropdown menu and select Everyone or Contacts Only. You will at present be able to transfer photos and videos wirelessly between your iPhone and your Mac.

Oft asked questions about moving iPhone photos and videos
Still accept questions about transferring photos and videos from your iPhone to your Mac? Hither are some frequently asked questions nosotros often come across.
Tin I transfer photo albums from iPhone to Mac?
Yeah. If you want your albums to transfer from your iPhone to your Mac, y'all should use method 2 (syncing your photos using the Photos app) or method 3 (syncing your photos using iCloud.
Can I delete photos from iPhone later on importing to Mac?
If you are syncing your photos and videos with your Mac using iCloud or the Photos app, do not delete the photos from your iPhone. This volition also delete images from your photo library on your computer.
If you lot want to save your photos on your Mac but delete them from your phone, utilize method 4 (transferring photos using Image Capture) or method five (transferring photos using AnyTrans). Both of these methods will save your photos and videos to the binder of your choice, but they will not be synced to your Photos library, allowing you to delete photos on your iPhone without losing them on your Mac.
How long does it take to import photos from iPhone to Mac?
The respond to this question depends on how many photos and videos you are transferring. AirDrop will have the longest to transfer big files simply because the data is existence transferred wirelessly. We've institute that AnyTrans works very chop-chop, transferring thousands of photos in just a few minutes. Plus, if you run a cleanup with Gemini Photos first, you won't be wasting times on photos y'all don't need.
Can I drag and drib photos from iPhone to Mac?
No. Instead of dragging and dropping, use ane of the methods listed in a higher place for transferring photos from iPhone to Mac.
Keeping your photos on your Mac instead of — or in addition to — your iPhone will give you an added level of security if your iPhone is ever lost, damaged, or stolen. No matter how many photos and videos you desire to transfer from your iPhone to your Mac, y'all tin do it quickly using the methods listed higher up. Experiment with them all to find a system that works for you.
Source: https://backlightblog.com/transfer-photos-from-iphone-to-mac
0 Response to "How to Upload Photo From Iphone to Mac"
Post a Comment